


ゴルフスイングで手首をヒンジする正確なタイミングと方法(詳細)
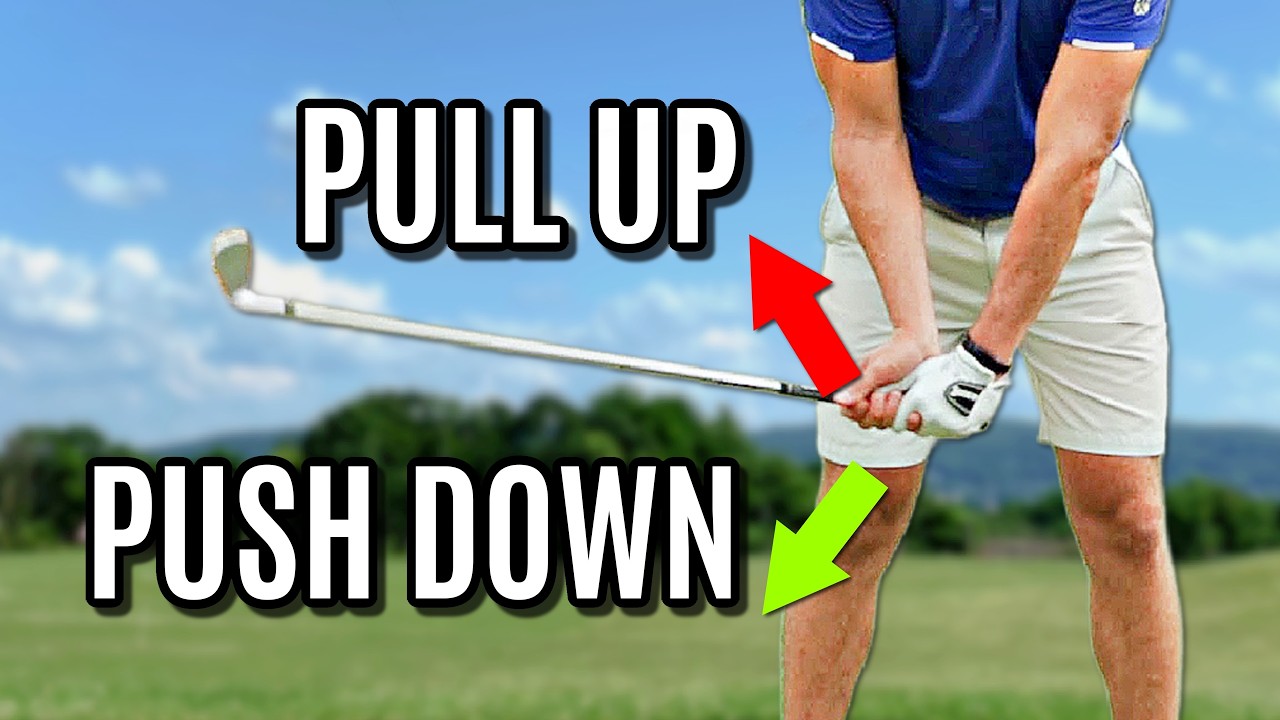
All right, guys. In today’s video, I’m going to show you something I did with a recent student of mine on how to hinge the club and set the club properly during the golf swing that will make things very simple for you. There’s three key checkpoints and one really big key that you must do that I’m going to show you in today’s video is going to really help you simplify your golf swing. Let’s dive right in. All right, guys. So, I had a recent student come in asking me about hinging the wrist during the golf swing. That’s some misconceptions. And basically, when it comes to hinging the wrist and doing the back swing, I sort of have one of two ways that I can go that I see with students that come in. I can hinge the club correctly during the back swing in an easy way that makes the rest of the swing really simple, or I can do some things as I go back in various ways to hinge the club that makes things very difficult. Both of those options can work, but doing it the way that I’m going to show you will make it much likely, higher likelihood that it works and much more simple throughout the swing. Now, there’s three key checkpoints and one really, really important factor that we’ll talk about. The three things I want to make sure you do, and then we’ll go through each one during the back swing. We have to learn how to get the left wrist from being cupped or bent here at setup to flat. That’s a big one. We need to be able to hinge the club vertically to about 90 to 100 degrees by this left arm parallel. And we need to be able to hinge the club relatively on plane, which means the butt of the club points right at or just inside this ball target line. All three of those. Left wrist needs to go from cup to flat. I need to hinge the club vertically about 90 to 100°. and I need to have the club basically on an angle that’s on plane. If I can do all three of those, I’m going to have a really easy time for the rest of my swing. But any one of those that’s off means more work later on. And the drill that I showed my student was really to help clarify that one trick, right? The the the one piece that’s so important. And what makes this hard is when you take your setup position and you hold it with your lead hand. depends a little bit on your grip style, but we’re going to have some amount of angle or cup in my wrist at setup. From the face on angle, while from the down the line angle, the club is relatively unhinged. So, we’ll pull Adam Scott as a model. Let’s say 140 to 145°. Okay. Now, when I make my back swing, I need to add vertical hinge to my wrist to the point where the shaft gets to about a 90° angle by left arm parallel. But when you do this, and I want you to do this with your left hand, hinge your left wrist up towards your face. And what happens to that angle in your wrist? For most of us, that angle is going to get even bigger. Even bigger. Meaning, this cup that I had at setup gets even more cupped. The more I hinge my wrist up, the more cupped the wrist gets. Now, that’s a problem when I make a swing with some forearm rotation because the club face is always going to be too open. Okay. So, just to give you a visual, when my left wrist stays too cupped with arm rotation during the back swing, which we all have, when I hinge my wrist, it cups more. When I do that on the way back with arm rotation, the face is always going to be open. Okay? So, if I bring that down, you see the toe is too far behind the heel. That means a lot more work later on. So from this position, while we hinge that wrist up, we need to be able to flatten out that lead wrist angle. That’s the trick of it. That’s what keeps the club face square during the back swing. Now, why do we need to hinge the club vertically at all? It’s really for two reasons. One’s for power. Okay, so if I had this 140° angle during the takeaway, not a ton of hinging. He’s adding a little bit of hinging. Okay, by the time he gets to left arm parallel, he’s at that 90. And as he finishes his turn, he gets to about 75. But the reason I need to be able to hinge that up on the way back is so that I can unhinge it on the way down. And that’s a power source. Imagine I make a golf swing where I keep this 140° angle the whole time. Okay? I can still hit a ball like this, but there’s very little power. Like if I try and literally keep that wrist hinge the same the whole way, I hit a full swing seven iron there. probably 120 yards. When I add my wrist hinge and I go up and down and try and do the same thing, that seven iron now goes like 180 yards. So, the wrist has to hinge up and down for speed purposes. The other reason it needs to hinge is what goes up must come down. Meaning that first ball I hit, I don’t know if you noticed, was very thin. The second ball I hit was very solid. Because the ball’s on a ground with an iron, I need the club head to travel some amount down to hit the ball. Ball first, ground second. For me to get my wrist to hinge down to hit the ball, they had to have gone where? Up. So, I had wrist hinge for power and to be able to hit the ball solid. But again, if you hold it with your left hand, that cup increases. And that’s where the trail hand really comes in. Now, you can feel with either one, but what I really want you to feel during the swing, and this is the drill, is I want you to be able to take your left hand and hinge the club up towards your face and hinge it down and hit the mat. This is what my do my student. I’ll back up from the ball here. So, up towards you to about 90°, hit the ground. Two. Three. That’s about how much hinge I’m looking for. If I want to get to that 75 like Adam Scott, I’ll go just past parallel. Up and down. Feel what your left wrist is doing. your left wrist is controlling the up and down motion. Now, if that’s true, when I go back, I can feel that same motion where I go just straight up. But how do I flatten it out? That’s where the right hand comes in. So, I want you to do three with this left hand. Up, down, up, down, up, down. Now, take your right hand. Now, you’re going to feel no up and down with your right hand. I just want you to feel back. Back means your knuckles towards the back of your forearm. So, the hands just going straight back this way with your right hand. And I’m doing that from about setup to left arm parallel. Okay. So, right hand goes back. Now, notice as I’m doing that, where’s the club here? It’s about what? 90 degrees to my arm. And where’s the butt of the club point? Basically, right at the ball target line. So, there’s an angle I’m trying to hinge on. Right? We want Let’s pull that list back up. We want the left wrist flat. We want the club about 90 hinged. And we want it on plane. So, what I’m going to do, and we’ll work through this drill here, and how I want you to practice this is I want you to feel the left hand going up and down, and I want you to feel the right hand going back and forth separate, and then we’re going to retain those feels together. So, if you can do this, pause the video, come back and watch it, or just kind of feel this with me. Let’s go up and down with the left wrist. Just just beyond 90 is fine. Up, down, one, two, three. Thud the mat. Don’t be afraid of that. That’s the piece that’s going to help you hit the ground during the down swing. you’re not taking enough divot or you’re able unable to hit the ground. You need to do that piece more. So, up and down three times. Right wrist goes back. No up motion at all. Just back. So, I’m kind of feeling like my palm is facing towards the camera. The back of my knuckles are going towards the back of my forearm. And it feels a little bit like the club face is more pointed towards the camera. Certainly, the toes in front of the heel. So, we’ll do that three times. One, two, three. Always hinging to 90°. Always on plane. Now, once I do three of each individually, I’m going to put my hands together and feel the same thing. Feel the left wrist go up and the right wrist back. Now, when I’m pulling my right wrist back, what is that doing to this cup in my lead wrist? It’s flattening it. So, you flatten your left wrist by pulling back your right wrist. You want to feel like your right wrist about almost as bent back as you can get it. Left wrist goes up, right wrist goes back. Left wrist goes up, right wrist goes back. hinging the club about to 90 degrees and right on plane just inside this ball target line just so you can see that and we’ll put some models on the screen. If I was doing that here, left wrist goes up, right wrist goes back, that’s going to point right at or just inside the ball line. Okay? So, what I want you to do is hit some shots where you feel that three just left hand, three just right hand, three together, hit a ball like whoa, that’s nine practice swings and one hit. Yeah, that’d be like a good good 10 ball practice set. Now, when I hit, I’m going to feel the same thing. Left wrist goes up, right wrist goes back. And in terms of amounts, and there’s a nice high seven iron draw in terms of amounts, I kind of want that Adam Scott model, you know, roughly 90 to 100 degrees by left arm parallel. And then from that spot, say, well, how what do I do from there? Really, you just keep turning. Technically speaking, from here, like my student said, “What do I do from here?” I said, “Well, just finish your turn and it’ll naturally continue hinging a little. It’ll go from, let’s say, 90 degrees to 75 and there’ll be a little bit of folding of your trail arm.” But a lot of that will happen by itself. The simplified version is just complete your swing. The more complicated is keep turning, keep folding your trail arm a little bit, right? But you want to focus on those same pieces. Left wrist up and down, right wrist back. This is taking care of the club face part. Flattening the left wrist, always hinging it where the butt of the club’s on or inside the ball line. Then I’m going to feel the same thing. Left wrist up, right wrist back together. And that gives me both, right? That gives me, why am I hinging the club? I need to hinge the club for power and to be able to hit the ball and ground to be able to take a divot, hit the ground, get the club to go down. What goes up must come down. Why is my right wrist bending back? To close the club face, right? I need to close the club face to be able to hit the ball reasonably at the target. Also, low to loft on up. And it it when in doubt to I wouldn’t mind you overdoing a couple like a lot of people I work with who can’t hit the ground once you do this like this is how you hit the ground like a hammer. Three, right wrist back, right wrist back, right wrist back. And I’ve I’ve had a lot of different drills if you search our older videos with wrist hinging with um variations of drills that are great. This is just a simplified kind of quick version here for you guys. Left wrist up, right wrist back. And those are all very solid. You would do this with all clubs. Sand wedge, seven iron driver. I want to thank our partners at Lab Golf. They just came out with the brand new Oz HS putter. You see this is my new one compared to the normal Oz. The big difference is this our first heel shafted putter. You see normal right with the center shaft model. Here they got the riser much more towards the heel. So if you like a little bit more traditional look with this, right, compared to the center shafted, you can see also I got some of the lines changed on there. I got the line down the middle of the putter, a little bit longer down the center. Same sort of head model, right? Feels really, really good off the face. Every time they release a putter, I tried it. It feels awesome. If you’re in the market for it, go to labgolf.com, use code gorno for 10% off. So, if you like that more traditional look, you want that same good feel and you’ve been waiting, this is their first heel shafted putter. Very cool. Labgolf.com, use code gorno to get 10% off. Now, the timing he asked about, I kind of mentioned, which is, you know, some players will do it earlier, some players will do it later. All things equal. I would say the better players probably tend to do it a little bit more later. All things equal, there’s more power there, but maybe a little bit less control. If you do want to hinge them a little bit earlier, I’m okay with that. Probably a little more control, maybe a little less power depending upon what you’re seeking. But the neutral level is like, hey, I’m doing it progressively the whole time. Kind of like Adam Scott. He goes from 140 to like mid130. So, he doesn’t hinge a whole ton. He’s not going like this. You can, okay, but he’s kind of neutral here. A lot of body motion. Am I doing just the hinge with no body? No. So, of course, there’s a good amount of body motion, but I’m getting to about 90 and then 75. The left wrist is flattening, the club’s on plane, but this is always a really nice way to do it. The left wrist goes up. We get rid of that cup by feeling the right wrist back. Now, if you don’t love the right wrist back and you want to feel like you’re curling those left wrist, you know, curling the glove logo away from you or curling the fingers under to flatten it out, perfectly okay with that. But I like and my student like left wrist up, right wrist back. Hit those three checkpoints that are on the screen. And that’s how I can get the solid contact and the straight shots. You know, a little micro piece in with that. My student I did talk about towards the end. He’s like, “Hey, what parts of the hands and wrists are controlling this? Should I feel more left? Should I feel more right?” Either and or both, depending upon what you need more of. If you need to square the face more, feel the right wrist bending back more, left wrist curling more. If you need more vertical hinging, you can feel more of the left wrist up part. Now, one other little caveat with that, or I guess two, if I were feeling specific parts of my hands, it’s mainly in the bottom three fingers of my left hand and making sure my heel pad is on top. It’s hard to hinge the club if the club’s in your palm. Okay? So, you want to make sure the grip’s a little more in your fingers. It’s the base of the three hands. You should be able to hinge the club up if you take your index finger and your thumb off. That’s how you know your heel pad’s on top. Just a little caveat with that. So, if anything, the bottom three of the left hand and if anything, the the right hand, I sort of feel the middle two fingers and a little bit of my index finger that’s pulling back. Really, the two middle fingers of my right hand and the three on my left. Some players will say, “Hey, should I push down on my left?” You can. You can if that helps. I like to just feel like I’m going up. But if you want to feel pushed down, totally fine. One more time. Up and down. Up and down. Up and down. Three times. back, back, back. Combine those. Let’s put that list on the screen one more time. The three checkpoints are left wrist flat, right clubs hinge to 90, and it’s on plane. And if you’re one of the players that I see that comes in and you go way too long with your swing and you way, way, way overhinge, and you want to feel less hinge, the more I hinge vertical with my left wrist, what does it do? It cups. It cups. If that’s true, that means the more I bow my wrist or bend my right wrist back, that will make me hinge less. Which means if you hinge too much, your left wrist is almost for sure too cupped. So if you feel like you bow your left wrist, get your knuckles away from your forearm or bend your right wrist back more, that’ll help you hinge less. If you need more hinge, you might feel like the, you know, the wrist hing that cups a little bit. Some of this a little grip dependent. Okay. But if you want less hinge, you’d feel more bow the left wrist, more bend back of the right wrist. Kind of like a John Rom, you would see he would hinge the least. If you want more hinge, you know, maybe like a Roy Moy, you can add a little more extension to your left wrist. But you got to have a grip to go along with it. Stronger grip, you can have a little bit more cup. Weaker grip, you want to be a little bit more flat. But those three big ones, one more. I’ll let you guys go. Those three keys, that’s how you practice all those. That’s kind of hinging simplified. The point of this video is that if you get you hit those three checkpoints, get the club on plane, left wrist, flat, 90 degree hinge, and just complete your turn from there. It should set you up for success. The easiest drill that I know is that left wrist up three times, right wrist back. Combine them. Use video to confirm. If you want someone to look at your swing and you want to really improve, like we were able to make massive improvements because I was able to see that gentleman’s swing, whether it be in person or online, go find a great coach to work with or send your swings into.com so we could look at them for a fraction of the price. You get world-class coaching and all the other stuff on the site. But hey, these are the priorities. These are the feels. These are the drills. This is what to expect. Get great results there. Would love to see you there. If you want to watch more like this, check out this video next.
Get the BEST Golf Swing Training App Ever Created Here: https://inf.getswingcoach.com/EC1
In this golf lesson, Eric Cogorno covers one of the golf swing basics – mastering wrist hinge in the golf swing. Eric’s instruction focuses on three key checkpoints in the golf backswing and a simple progressive golf drill. Modeling the wrist positions of PGA Tour Pro Adam Scott, Eric teaches the golf swing tips that can help any golfer generate an easy golf swing, create more power, improve accuracy, and achieve more consistent ball striking.
⏱️ TIMESTAMPS:
🏌️♂️01:31 – The three key checkpoints for wrist hinge in the golf swing: left wrist flat, 90° hinge, club on plane.
⚠️ 03:07 – Cupped left wrist during hinge leads to an open clubface and inconsistent shots.
💪 05:42 – Wrist hinge up and down is essential for power and solid ball contact with irons.
🔄 06:38 – Golf Drill: Practice left wrist moving up/down and right wrist moving back separately, then together.
🎯 09:48 – Right wrist bending back helps flatten the left wrist and close the clubface for better accuracy.
⏱️ 11:39 – Timing of wrist hinge varies: later hinge tends to increase power, earlier hinge improves control.
🔧 14:21 – Grip and wrist mechanics interrelate: stronger grip allows more wrist cup; weaker grip needs flatter wrist.
WHAT YOU’LL LEARN:
• Proper wrist hinge in the golf back swing is fundamental to simplifying the golf swing and improving power and accuracy.
• The left wrist must transition from cupped at setup to flat by left arm parallel to maintain a square club face.
• Vertical wrist hinge should reach about 90 degrees at left arm parallel, allowing efficient power generation and solid ball striking.
• The end of the golf club must remain on or just inside the ball target line to maintain an on-plane swing.
• The right wrist pulling back helps flatten the left wrist and close the clubface.
• Practicing the golf drill separating left wrist up/down and right wrist back before combining builds correct feel and timing.
• Grip and individual differences impact wrist hinging style; adjustments in grip strength and wrist motion can tailor the feel.
• Over hinging causes excessive wrist cupping; bowing the left wrist and bending the right wrist back reduces hinge.
• Timing of wrist hinge varies by player skill and style but generally progresses through the backswing rather than occurring early or remaining static.
#EricCogorno #wristhingegolf #howtohingethewrist #flatleftwrist #golfbackswing #easygolfswing #golfswing #golflesson #golfdrills #PGATour #golflesson
_____________________________________________________________________________________
GET PERSONALIZED GOLF COACHING at https://www.cogornogolf.com!
MY BEST STEP-BY-STEP GOLF TRAINING PROGRAMS HERE: https://ericcogornogolf.podia.com
Check out our awesome partners and the products I personally recommend + DISCOUNT CODES:
Takomo Golf – https://takomogolf.com
L.A.B. Golf – https://labgolf.com – Use Code COGORNO for 10% OFF
LiveView Sports – https://liveviewsports.com/pages/ECGolf – Use Code ECGOLF for $40 OFF
Precision Impact Right Wrist Trainer – https://pureswingproducts.com/?sca_ref=1815522.bXQUsGp2bS – Use Code COGORNO for $20 OFF
theHanger Training Aid – https://www.hangergolf.com/?sca_ref=944104.HqM9GYcX2I – Use Code COGORNO to get 15% off!
Awesome lesson per usual. Thank you for the step by step simple explanation.
Eric, this is great content and timing. I've been really struggling with my take away/backswing and I knew the importance of it and so wanted to iron it out. These recent videos regarding wrist hinge, backswing, and even the hip movement have really helped me to understand the basic and necessary movements needed to have a solid swing. I really like how you explain the reasoning behind every action as well. Thanks!
Thanks. That is an excellent explanation. I have never had this explained so well (or at all). Even got to scratch 20 yrs ago not knowing this basic action.
Looking forward to more precise tomorrow.
Great lesson; now if you do the same tyoe of simplified lesson on the wrist movement during the downswing and follow-through, that would be golden 🙂
Eric! My sister lives in Tampa and my dad lives on the other side Boyton beach how far are you from them? I would love to come visit you and get a lesson with you sometime
This video was timed perfectly for me. I recently figured out how to use wrist hinge for proper power, but I was so confused because I had to strengthen my grip so much to hit it straight, because the club face was so open. That right hand tip and grip tip saved my next few rounds, thanks a ton.
Do you unhinge at impact?
Great stuff thank you Eric.
Does the combination of the lead hand vertical to face and the trail hand back combine to the 45 degree angle take away that we sometimes hear about? If so, it’s cool to know how the individual hands operate to get there.
Great video, really good explanation. Would this also include woods and driver?
Me gusta
Love your videos, but I can't stand the look of those lab putters! Scotty all the way!!
Another gem. Man I love your stuff!
Great job of describing what each wrist needs to do, freeing the golfer to choose which one to focus on.
Great video!
You make it so easy to understand, I dont know why anyone would go to any other teacher. You should have 5 million subs.
If you have a very strong grip, wouldn’t a flat wrist going back shut the face too much?
If I don’t leave some cupping I’ll hook it off the planet.
thanks Eric, superb as always, pretty sure you'll have done a video on wrist movement during the downswing and follow-through, could you post the link if so, thanks ✊
Eric, great video. What videos do you have that talk about the transition and downswing. I have a low point control problem and rarely hit ball first and rarely take a divot and if I do it is due to a fat shot 🙁
I wanted to say thank you Eric. My first golf round was December and second was March. I have absolutely zero chill and play 2-3 times a week for the entire summer. I just shot a 34 on a par 3 course with zero forgiveness. The primary reason is because of your videos. You're the man.
Does this concept apply to the driver as well Eric?
I can not stop my club face from closing. My grip is good, im coming from the inside not over the top. What am I doing wrong
좋은 레슨 감사 합니다~~
Have u ever done a video using hack motion?
Thank you Eric!!